


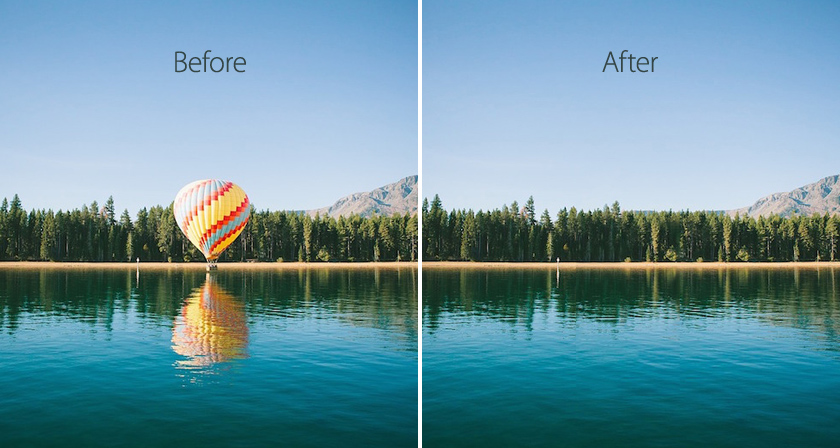
Object Removal Made Simple: Tools and Tips for Flawless Photo Editing
Introduction: In the world of photography, capturing the perfect shot often requires meticulous attention to detail. However, even the most skilled photographers occasionally encounter unwanted objects or distractions in their images. from clearoff Fortunately, with the advancement of photo editing software and a range of powerful tools at our disposal, removing these unwanted elements has become a relatively simple task. In this article, we will explore various tools and techniques that can be employed to seamlessly remove objects from your photographs, ensuring flawless results.
- Selection Tools: One of the fundamental steps in object removal is selecting the area that needs to be removed. Most photo editing software provides a range of selection tools that can help you isolate the object with precision. These tools include:
a) Lasso Tool: This tool allows you to manually draw a selection around the object using a freehand or polygonal approach. It’s great for irregularly shaped objects or those with complex edges.
b) Magic Wand Tool: The magic wand tool selects areas based on color and tonal similarity. It’s useful for selecting objects with distinct color differences from the background.
c) Quick Selection Tool: The quick selection tool utilizes algorithms to automatically detect and select areas based on similarity. It’s a convenient option for selecting objects with well-defined edges.
- Content-Aware Fill: Content-Aware Fill is a powerful feature available in popular editing software like Adobe Photoshop. It analyzes the surrounding pixels and intelligently fills in the selected area with information from the nearby region. Here’s how you can use it effectively:
a) Make a precise selection around the object you want to remove using the selection tools.
b) In Photoshop, go to Edit -> Fill, and select “Content-Aware” from the “Use” dropdown menu.
c) Click “OK,” and the software will work its magic to seamlessly fill in the selected area with content from the surrounding area.
- Clone Stamp Tool: The Clone Stamp tool is a versatile tool that allows you to manually clone pixels from one part of an image to another. Here’s how you can use it:
a) Select the Clone Stamp tool from the toolbar in your editing software.
b) Adjust the brush size, hardness, and opacity according to your requirements.
c) Alt-click (Option-click on Mac) on the area you want to clone from, which will sample the pixels.
d) Click and drag the brush over the object you want to remove, effectively replacing it with the sampled pixels.
- Healing Brush and Spot Healing Brush: The Healing Brush and Spot Healing Brush tools are excellent for removing smaller imperfections, blemishes, or objects from an image. They automatically blend the sampled pixels with the surrounding area for a seamless result. Here’s how to use them:
a) Select either the Healing Brush or Spot Healing Brush tool from the toolbar.
b) Adjust the brush size, hardness, and opacity as needed.
c) Alt-click (Option-click on Mac) on a clean area similar to the object you want to remove, which will sample the pixels.
d) Brush over the object, and the software will blend the sampled pixels with the surrounding area, removing the object smoothly.
- Patch Tool: The Patch Tool is another powerful tool for removing objects. It allows you to select an area to patch and then drag it to a clean area, blending it seamlessly with the surroundings. Here’s how to use it:
a) Select the Patch Tool from the toolbar.
b) Draw a selection around the object you want to remove.
c) Click and drag the selection to a clean area that matches the surrounding pixels.
d) Release the mouse button, and the software will blend the patched area with the surroundings, removing the object effectively.
Tips for Flawless Object Removal: While the tools mentioned above provide the means to remove objects from photos, here are some additional tips to ensure flawless results:
- Take your time: Object removal requires patience and precision. Avoid rushing through the process to achieve the best possible outcome.
- Use multiple tools: Combine different tools and techniques to tackle different parts of an image. Some tools work better for specific situations, so experimentation is key.
- Pay attention to details: Zoom in and scrutinize the image carefully. Pay attention to edges, texture, and lighting to ensure a seamless blend between the object and the background.
- Save your progress: Save multiple versions of your edited image as you progress, allowing you to revert to previous stages if needed.
Conclusion: Object removal has become a relatively straightforward task thanks to the advancement of photo editing software and the availability of powerful tools. Whether you’re a professional photographer or an amateur enthusiast, mastering these tools and following the tips provided will help you achieve flawless results in your photo editing endeavors. Remember, practice makes perfect, so don’t be afraid to experiment and refine your techniques over time. Happy editing!
To remove unwanted objects from photos online free from here